
As any interactive designer can tell you, style sheets can be pretty handy things. I learned about them in QuarkXPress, which was kind of a big deal before the internet was much of a thing, and my primary means of income before I switched to copywriting. But the basic principle is the same wherever they appear. I think style sheets in Word don’t get much love because the default styles tend to be kind of garish. But changing the default styles to your liking is, mercifully, pretty easy.
In keeping with our goals of productivity and efficiency, we don’t want to do anything more often than we need to – so we have more time for endless rounds of client revisions. With that in mind, if we’re going to the trouble of creating a set of style sheets that are precisely to our liking, we’re also going to want to save them in the main template (I’ll explain how in a moment), or in a *.dotx file.
Style sheet basics
Style sheets are a way to format paragraphs and characters instantly and consistently, and then to change the look of an entire document instantly and non-destructively. If you’re like most people, you open up a Word document and start typing, and don’t change the fonts at all. But maybe you’re a Helvetica purist, so you change your font to Helvetica, and then when you need to make a heading you increase the font size and bold it, and maybe you use the format paintbrush to create new paragraphs and headings to match as you go along.
Style sheets let you save those styles as presets, so you can just select some text, click a style sheet, and voilà, it changes to what you want it to look like. Style sheets in HTML work exactly the same way. Your actual document contains a bunch of generic tags, and your style sheet defines how all those tags will appear. This is a super reductive explanation. If you’d like to know more about CSS, the CSS Zen Garden is a great place to start.
The new Normal
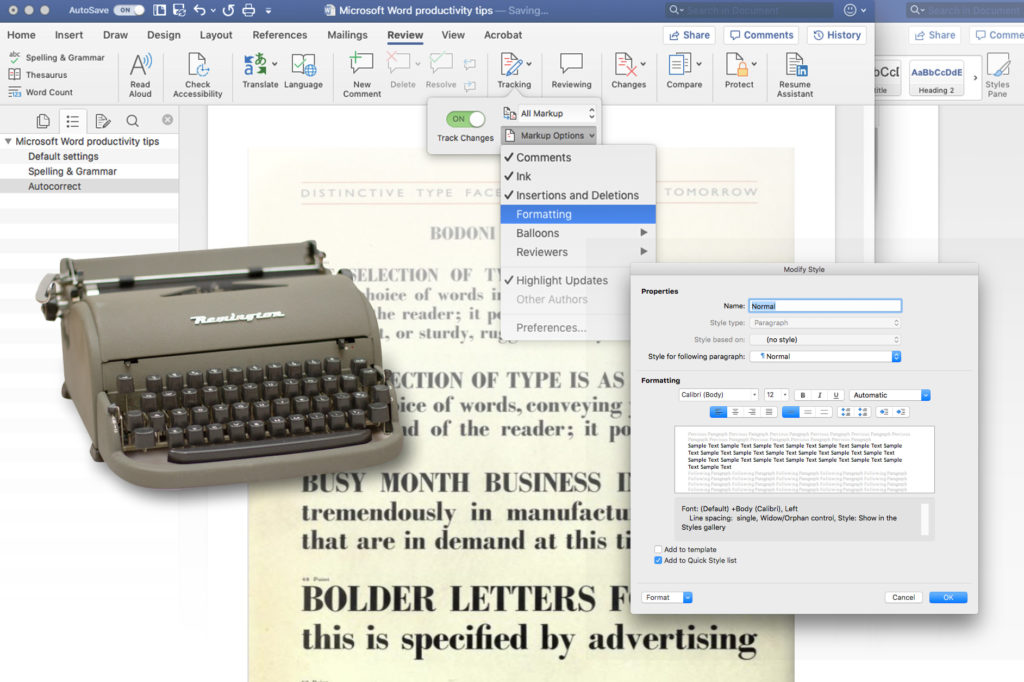
When you open up a new document in Word and start typing, you’re already using style sheets, but if you don’t bother to alter them or change styles from one paragraph to another, you may not notice it. But you have started typing using the Normal style. You can prove me right by typing in a few words, then heading up to the style menu and right-clicking on the Normal style block. You’ll see a drop-down menu, from which I’d like you to select Modify…
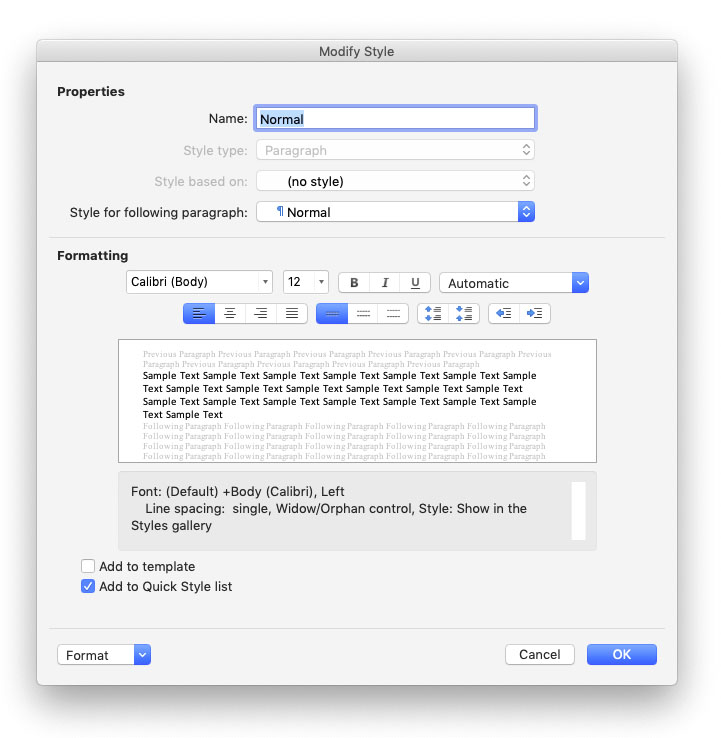
Under Formatting, change the font to something obviously different, like American Typewriter. Hit OK. Whatever you typed should have changed to your new font, because you changed the style it’s based on. And if you change other things in that window, font size, bolding, underlining, alignment, character spacing, those will all be applied to your normal style.
If you go back and look at that Modify Style menu, you’ll notice a checkbox that says “Add to template.” If you do that, you apply that style change to the template that determines what your default new document styles will be. So if you’d rather have the default font for new documents to be Helvetica Neue than Calibri, that’s how you’d do it.
You are legend
Most of the agencies I work with have some kind of consistent legend for their copy decks, which is probably a good idea. Body copy looks like your normal style, whatever font you set it to, maybe instructions and alt text are red, changes are highlighted and so on. Maybe legal is italicized. Can I just ask you, please, not to make the legal 5 point italic in your Word documents, because that makes no sense. While it’s in your copy deck you want to be able to read it. When it gets to the website, or the back of the letter, you can leave it to the designer to make as unobtrusive as legally permitted.
Creating styles to match your legend is easy. Just select your text and style it the way you want it to look, then go to Format > Style… from the main menu (you can also accomplish something similar by opening the Styles Pane from the Home ribbon). Click “New Style…” and a window will open with a new style based on the text you selected, waiting to be named and saved. Once you do that, it will appear in your Style menu.
Using heading styles
You may have noticed that the default style sheets include styles called Heading 1, Heading 2, and so on. If you think these bear a striking similarity to the HTML entities h1 through h5, you’re not far wrong. If you were to save a Word document containing some of these headings as a web page (please don’t – just because you can is no reason you should), that’s what they would get translated into. As such, these heading styles perform a few useful functions, particularly if you’re writing online copy.

Creating headings styles from existing text is even easier than creating new styles. Again, style your text the way you’d like it to appear, select it, then head up to the style menu and right-click on the style you want to update. Your first option in the menu that appears is “Update Heading [#] to Match Selection” – and I think you can guess what that does.
The navigation sidebar
The first handy thing you’ll find when using these heading styles is if you open up the Navigation sidebar (View > Sidebar > Navigation), these headings become a nested navigation menu. Double-click to get to any heading in your document instantly, which is particularly convenient with longer documents. And as the gods of SEO have decreed, you should only have one h1 heading per page, and your headings should be nested without skipping (h2 to h3, and not h2 to h4). The navigation pane is a handy way to keep track of that – as well as the overall structure of your piece.
Creating a table of contents
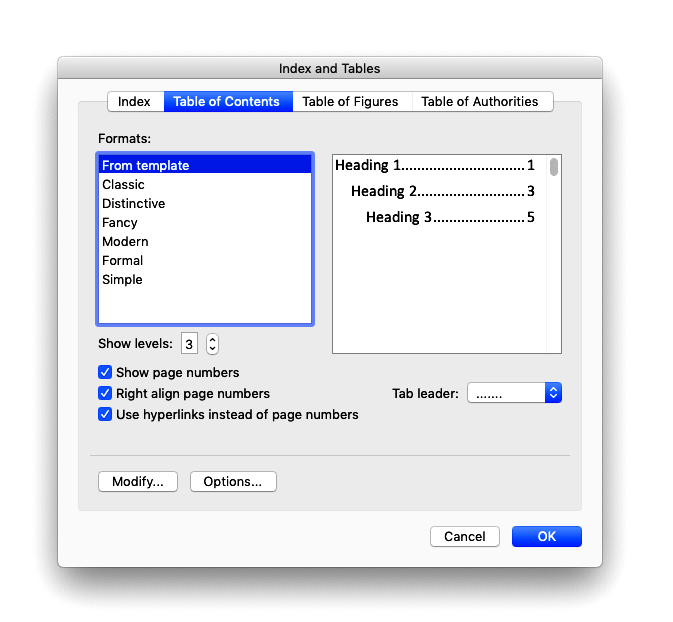
The navigation pane functions as a handy, clickable table of contents for your document. If, however, you’d like a table of contents visible in your document, you can also create one automatically based on your headings. Simply place your cursor where you’d like your table of contents to appear (probably at the start of your document) and select Insert > Index and Tables… from the main menu. Select the Table of Contents tab, make any adjustments or modifications you feel necessary, and click OK.
This table of contents is also clickable. I’ll sometimes insert a ToC in a longer document, particularly if I’m writing for an application or a website, because it not only helps you and your clients find your way around, it can also show you at a glance if you’ve left any important pieces out.
The ToC does not, however, auto-update page numbers if you edit and reflow your document. To do this you’ll need to re-insert a new one in place of the old one. Click as if you’re placing the cursor at the beginning of the table (your cursor should look like the text insertion tool, and not a pointing finger) and the entire table will be selected. Then follow the same insertion procedure you did before.
Get styling
Once again, I hope this is all helpful and of at least some interest to you. In the third and final Word tips article I’m just going to cover a few odds and ends that didn’t find their way into the first two.